


A simple download
Now that our camera is configured we will download our first images. Connect your camera and run the downloader if needed (if your camera is detected the downloader should run automatically). The following window appears:
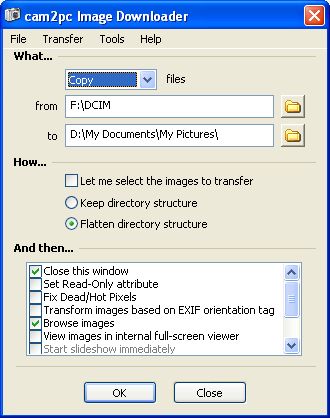
The top of the window sets what we want to do: copy or move files from a location (here a auto-connect device that was assigned the F: letter) to a directory. For you first transfer it is recommended to select a Copy operation to make sure you do not lose your pictures. Once you are familiar with cam2pc you can switch to "Move".
By default, the destination is set to the My Pictures folder. You can change the destination by clicking the folder button on the right and choose an existing folder. Also, you can type in directly the name of a folder in the text field. If you specify a directory that does not exist, it will be created for you automatically.
The source text field is disabled for Sierra-Imaging based cameras and Canon cameras.
Then you can specify if you want to keep the folder hierarchy defined on your memory card. You should leave this to Flatten as most cameras do not support folder creation on the memory card. If you camera does and you care about this then simply switch to "Keep directory structure".
If you do now want to select all the pictures on your camera then check "Let me select...". In that case a dialog will appear showing thumbnails for all the images found on your camera. You are able to individually select which ones you want to download. For a faster process you can also select or deselect images simply by clicking on the date items in the upper right corner.
The last pane indicates what you can do once you have transferred your images:
- Close the download dialog
- Set the read-only attribute on transferred files to avoid unwanted file deletion
- Fix dead and hot pixels (see Dead/hot pixels removal)
- Transform images based on EXIF orientation tag (see Rotate and Flip)
- Browse the transferred images in the Image Browser
- View the transferred images in the full-screen viewer (you can also start the slideshow immediately)
- Open the folder to where the images were transferred in Explorer
- Launch the associated application (of course this does not make sense if you associated image files with cam2pc).
You can select any number of theses actions. They will be executed sequentially: if you choose "Browse" and "Full-screen viewer" then full-screen viewer will not appear until you close the Image Browser.
Once you have set all these options, then simply click the OK button. The image will be copied or moved depending on your choice and the actions you selected will be performed.
Click the Close button to hide the dialog without transferring pictures or at the end of a transfer if you did not select the "Close this window" option.